

On this article, we’ll stroll via the way to combine ShadCn into React apps. Learn to arrange a brand new React challenge, set up and configure ShadCn, and benefit from its options. Whether or not you’re a newbie or an skilled developer, uncover insights to streamline your improvement with ShadCn in a React utility.
You possibly can try the entire supply code on GitHub.
What’s ShadCn?
ShadCn is a flexible library that gives a variety of utilities and elements to boost your React functions. It’s designed to simplify the event course of, enhance utility effectivity, and create a extra user-friendly expertise. ShadCn is constructed on prime of Tailwind CSS and Radix UI, permitting for prime customizability and seamless integration with Tailwind’s utility-first strategy.
Conditions for ShadCn Set up
Earlier than you begin with ShadCn set up, guarantee a well-prepared atmosphere. Have a foundational understanding of JavaScript and React.js, with Node.js put in in your machine. Familiarity with CSS and HTML is helpful for efficient ShadCn utilization. Since ShadCn integrates with Tailwind CSS, a fundamental understanding of Tailwind will even be useful.
Setting Up a New React Utility
To provoke your challenge, begin by organising a brand new React utility. To do that, run the next command in your terminal:
npm create vite@newest
Then title the challenge, and choose your language (ideally TypeScript, as ShadCn works out of the field with TypeScript).
Then transfer into your challenge folder and run the set up command:
npm set up
Lastly, begin up your dev server by operating the command:
npm run dev

Setting Up Tailwind CSS
To customise ShadCn elements, you’ll want to put in and configure Tailwind CSS. Tailwind is a utility-first CSS framework that works seamlessly with ShadCn, permitting you to simply modify and elegance the elements to suit your challenge’s necessities. To put in Tailwind, run the command:
npm set up -D tailwindcss postcss autoprefixer
npx tailwindcss init -p
Then paste the next into your index.css file:
@import "tailwindcss/base";
@import "tailwindcss/elements";
@import "tailwindcss/utilities";
After that, head over to your tsconfig.json file and modify the paths:
    "baseUrl": ".",
    "paths": {
      "@/*": ["./src/*"]
    }
By including the baseUrl and paths sections underneath compilerOptions, the modified tsconfig.json file allows path decision for imports beginning with @/, which maps to the ./src/ listing in your challenge.
Lastly, set up nodes in your challenge, to stop path errors:
npm i -D @varieties/node
Then modify your vite.config.ts:
import path from "path"
import react from "@vitejs/plugin-react"
import { defineConfig } from "vite"

export default defineConfig({
  plugins: [react()],
  resolve: {
    alias: {
      "@": path.resolve(__dirname, "./src"),
    },
  },
})
Updating the vite.config.ts file with the trail decision configuration ensures that your utility can resolve the paths appropriately, permitting you to import modules utilizing the outlined aliases. This step is vital for a clean improvement expertise and to keep away from any import errors associated to path decision.
Putting in and Configuring ShadCn
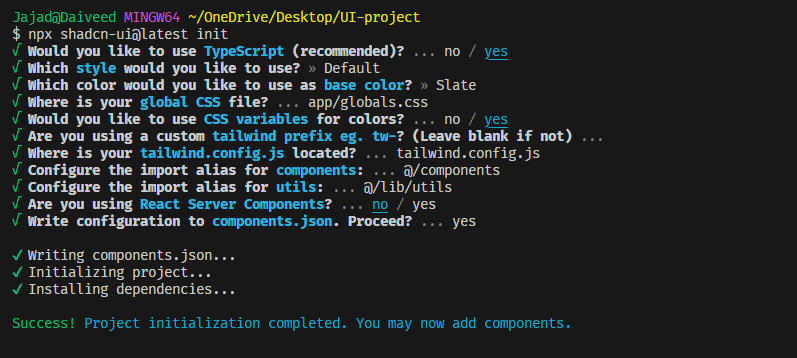
Along with your React utility arrange, it’s time to put in ShadCn. You are able to do this utilizing npm with the next command:
npx shadcn-ui@newest init
The immediate brings up a few choices so that you can select from.
Utilizing ShadCn in your React Utility
After the profitable set up and configuration of ShadCn, now you can start utilizing it in your React utility. For example, let’s use the hover-card part. Head over to the Shadcn docs and seize the immediate for the hover-card:
npx shadcn-ui@newest add hover-card
Then import it into your app and use it:
import {
  HoverCard,
  HoverCardContent,
  HoverCardTrigger,
} from "@/elements/ui/hover-card";

export default perform App() {
  return (
    <div className="flex justify-center  items-center h-screen">
      <HoverCard>
        <HoverCardTrigger>First Shadcn Element</HoverCardTrigger>
        <HoverCardContent>My first of many elements</HoverCardContent>
      </HoverCard>
    </div>
  );
}
This yields the end result proven under.

Modifying a Shadcn part
To edit a ShadCn part, you may leverage the facility of Tailwind CSS to customise its look and habits. As an example, you need to use Tailwind to edit the looks of the hover-card part by passing types by way of the classname prop:
<HoverCard>
  <HoverCardTrigger className=" rounded-xl text-white py-2 px-4 bg-slate-500 ">
    First Shadcn Element
  </HoverCardTrigger>
  <HoverCardContent className=" font-bold text-slate-500 w-max">
    My first of many elements
  </HoverCardContent>
</HoverCard>
This makes the part seem as proven under.

Conclusion
Incorporating ShadCn into your React functions doesn’t have to be a sophisticated course of. With a transparent understanding of the stipulations, a working React utility, and the fitting configuration, you’re nicely in your approach. ShadCn’s huge number of utilities and elements make it a wonderful software for enhancing your React functions, simplifying the event course of, and making your functions extra environment friendly and user-friendly.
