

On this article, we’ll discover React Spring, a JavaScript-based animation library. We’ll have a look at its options, together with the assorted hooks and elements it presents, and easy methods to make use of them in React functions.
The idea of animation in React functions has been an ever-evolving side of frontend improvement. Initially, animations in React have been achieved utilizing CSS transitions and animations, however as React Functions develop into extra complicated, the necessity for extra highly effective animation instruments turned obvious. This led to the event of JavaScript-based animation libraries, similar to Framer Movement, Remotion, and React Spring. Every of those libraries presents distinctive options and capabilities for creating animations in React.
Background Data
This text assumes you have got the next:
Introduction to React Spring
React Spring is a JavaScript animation library used to create interactive animations in React functions. Not like conventional CSS-based animations or different React animation libraries, React Spring makes use of physics-based animations, which mimic real-world movement and create a extra natural-looking impact.
These animations will be utilized to any property of React elements, together with place, scale, opacity, and extra. This makes it a strong instrument for builders seeking to improve the person expertise of their React functions with charming animations.
Organising React Spring in our mission
To animate elements in our React mission utilizing React Spring, now we have to comply with these steps:
-
Obtain and set up the React Spring library. We are able to do that both utilizing
npmoryarn:npm set up react-springyarn add react-springThese instructions will set up the
react-springlibrary and its dependencies into our mission listing. -
After putting in React Spring, we have to import the required elements and hooks into our React elements to start out animating parts. This may be achieved utilizing the next syntax:
import { animated, (hook) } from 'react-spring'
Within the code snippet above, we’re importing two dependencies (hook and animated) from the React Spring library. Right here’s a breakdown of how every of them works and why they need to be imported.
Animated
In React Spring, the animated namespace gives a set of elements which might be used to animate parts in our React software. It gives the animated variations of ordinary HTML parts similar to <div>, <span>, and <img>. These animated parts can be utilized rather than their regular HTML parts, permitting us to use animations to them utilizing React Spring’s animation hooks.
Hooks
React Spring gives a number of hooks that assist to create animations in React elements. These hooks simplify the method of managing animations and make it straightforward to combine them into our elements. Listed below are among the most important hooks offered by React Spring:
-
useSpring. That is often used normally because it creates a single spring animation that adjustments information from the preliminary state to a different.
-
useTransition. This animates the addition, elimination, or reordering of listing objects. It manages the animation lifecycle of parts as they enter or go away the DOM, permitting for clean transitions between completely different states of an inventory.
-
useTrail. That is used to create a number of spring animations that create a “path” impact, the place every spring follows or trails behind the earlier one.
-
useChain. Identical to a series that is used to outline a sequence of animations utilizing by specifying the order wherein they need to happen.
-
useSprings. Though that is much like
useSpring,useSpringsis used for managing a number of spring animations on the identical time, whereasuseSpringmanages a single spring animation.
To additional perceive how these work, let’s have a look at the completely different animation types we will obtain with every of those hooks.
Utilizing useSpring to Create Animations
The useSpring hook in React Spring is used to create animations utilizing spring physics. It permits us to outline the beginning and finish factors of an animation and makes use of its library to deal with the transition between them. For instance:
 const props = useSpring({
 opacity: 1,
  from: { opacity: 0 }
  });
On this instance, we’ve created a perform that adjustments the opacity of a component from 0 to 1. This perform will be known as on varied parts relying on our animation results. Let’s have a look at the steps to take when utilizing the useSpring hook to create animations …
First, import the dependencies wanted for the animation:
import { useSpring, animated } from "react-spring";
Subsequent, we have to outline a element and use the useSpring hook to create animated values. The useSpring hook accepts two main arguments:
-
Configuration object. This defines the properties of our animation, together with:
- from: the preliminary state of the animated worth (similar to opacity: 0)
- to: the goal state of the animated worth (similar to opacity: 1)
- config (non-compulsory): an object to fine-tune the spring physics habits (similar to mass, pressure, friction)
-
Callback perform (non-compulsory). We are able to use a perform to create a dynamic configuration based mostly on props or information.
Making a useSpring animation will be achieved utilizing two completely different strategies: utilizing an object literal, and utilizing a perform parameter.
Utilizing an object literal
We are able to outline an object with the properties we wish to animate, similar to opacity or colour, and go it to the useSpring hook. This method permits us to specify the goal values for the animation straight.
To elucidate how this works, let’s create a easy element that animates the opacity of a component:
import React, { useState } from 'react';
import { useSpring, animated } from 'react-spring';

perform App() {
  const [isVisible, setIsVisible] = useState(false);

  const opacityAnimation = useSpring({
    opacity: isVisible ? 1 : 0,
    config: {
      pressure: 200,
      friction: 20
    }
  });

  const toggleVisibility = () => setIsVisible(!isVisible);

  return (
    <div>
      <button onClick={toggleVisibility} aria-label={isVisible ? 'Cover' : 'Present'}>
        {isVisible ? 'Cover' : 'Present'}
      </button>
      <animated.div fashion={opacityAnimation}>
        This textual content will fade in and out with spring physics.
      </animated.div>
    </div>
  );
}
export default App;
On this code snippet, we create a button that toggles the visibility of some textual content when clicked. It does this through the use of two hooks, useState and useSpring.
It makes use of useState to test if the textual content is seen or not and creates an animation that adjustments the opacity of a textual content based mostly on the situation:
opacity: isVisible ? 1 : 0
This offers an animation impact as soon as the button that calls the toggleVisibility() perform is clicked.
Utilizing a perform parameter
Alternatively, we will go a perform to the useSpring hook. This perform receives the earlier animated values and returns an object with the up to date values for the animation. This offers us extra management over how the animation behaves over time:
 const opacityConfig = {
    pressure: 300,
    friction: 40,
  };


  const opacityAnimation = useSpring(() => ({
    opacity: isVisible ? 1 : 0,
    config: opacityConfig,
  }));
On this method, the configuration (pressure and friction) is extracted right into a separate object — opacityConfig — and this presents larger flexibility for dynamic management based mostly on state or props.
Animating Record Objects with useTransition
UseTransition is a React Spring hook that animates parts in arrays as they’re added or faraway from the DOM. It’s significantly helpful for creating fluid animations in lists or modals. To do that, it accepts an inventory of doable configurations:
fromdefines the preliminary types for the objects getting into the DOM.enterspecifies the types to animate to when objects are added. We are able to create multi-step animations by offering an array of objects.go awayunits the types utilized when objects are faraway from the DOM.replacecontrols easy methods to animate adjustments between present objects.keypermits us to explicitly outline a singular key for every merchandise. This makes it doable to outline particular animations for particular person objects.fromandtowith transitions: these can be utilized insideenter,go away, andreplacefor extra complicated animations with beginning and ending states outlined independently.
For example how useTransition works, let’s create a element that provides and removes objects from an array:
import React, { useState } from "react";
import { useTransition, animated } from "react-spring";

perform App() {
  const [items, setItems] = useState([]);

  const addItem = () => {
    const newItem = `Merchandise ${objects.size + 1}`;
    setItems([...items, newItem]);
  };

  const removeItem = () => {
    if (objects.size === 0) return;
    const newItems = objects.slice(0, -1);
    setItems(newItems);
  };

  const transitions = useTransition(objects, {
    from: { opacity: 0, remodel: "translate3d(0, -40px, 0)" },
    enter: { opacity: 1, remodel: "translate3d(0, 0, 0)" },
    go away: { opacity: 0, remodel: "translate3d(0, -40px, 0)" },
  });

  return (
    <div className="transitionDiv">
      <div>
        <button onClick={addItem}>Add Merchandise</button>
        <button onClick={removeItem}>Take away Merchandise</button>
      </div>
      <div className="transitionItem">
        {transitions((fashion, merchandise) => (
          <animated.div fashion={fashion} className ='listing'>{merchandise}</animated.div>
        ))}
      </div>
    </div>
  );
}

export default App;
On this instance, now we have an App element that manages an inventory of things. It gives buttons to dynamically add or take away objects from the listing. When the Add Merchandise button is clicked, a brand new merchandise is added to the array, and when the Take away Merchandise button is clicked, the final merchandise is faraway from the array.
The useTransition hook is used to handle the transitions of things within the array. Each time the array adjustments (as a consequence of including or eradicating objects), useTransition handles the animations for these adjustments in response to the desired configuration (outlined by the from, enter, and go away properties).
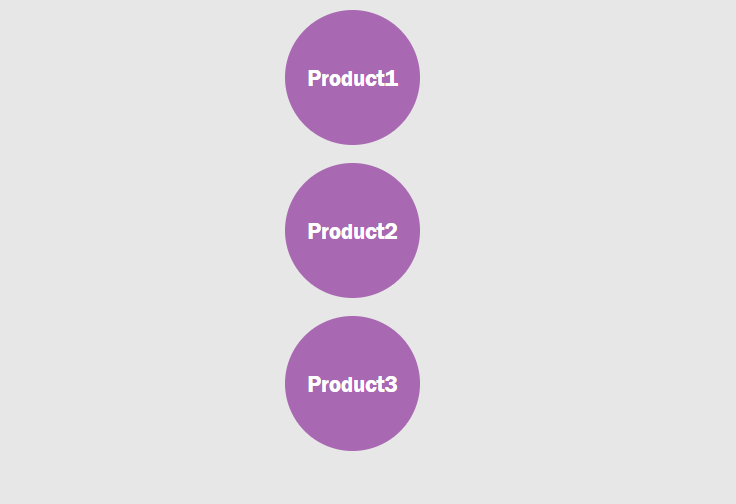
Animating arrays with out adjustments
If there are not any dynamic adjustments within the array itself, similar to including or eradicating parts, useTransition can nonetheless be used to animate every ingredient within the array. For instance:
import { useTransition, animated } from "@react-spring/net";
import "./App.css";

const identify = "Product1";
const name1 = "Product2";
const name2 = "Product3";

perform App({ information = [name, name1, name2] }) {
  const transitions = useTransition(information, {
    from: { scale: 0 },
    enter: { scale: 1 },
    go away: { scale: 0.5 },
    config: { length: 2500 },
  });

  return transitions((fashion, merchandise) => (
    <div className="nameBody">
      <animated.div fashion={fashion} className="nameDiv">
        {merchandise}
      </animated.div>
    </div>
  ));
}

export default App;
On this instance, the App element renders an inventory of things and applies animations every time the web page hundreds.
Creating Sequential Animations with useTrail
The useTrail animation is used to create a sequence of animated transitions for a gaggle or listing of UI parts.
Not like conventional animation strategies that animate parts individually, useTrail permits us to animate parts one after one other, thereby making a “path” impact. That is often used when creating dynamic lists, picture galleries, web page transitions, or any situation the place parts have to animate sequentially.
Right here’s the fundamental construction of the syntax:
const path = useTrail(numberOfItems, config, [trailOptions]);
Let’s break this down:
-
numberOfItems. This can be a required quantity that specifies what number of parts we wish to animate within the “path”. -
config. That is an object that defines the animation properties for every ingredient within the path. Every key within the object represents an animation property and its worth will be based mostly on our supposed animation. For instance:from: { opacity: 0, remodel: 'translateX(50%)' }, to: { opacity: 1, remodel: 'translateX(0)' }, transition: { length: 500, easing: 'easeInOutCubic', }, -
trailOptions(non-compulsory). That is an array of further choices for the path. Some widespread choices are:trailKey: a perform to generate distinctive keys for every ingredient within the path (helpful for React reconciliation).reset: a perform to reset all animations within the path.
Let’s check out the way it works:
import React, { useState, useEffect } from "react";
import { useTrail, animated } from "react-spring";

perform App() {
  const [items, setItems] = useState([
    { id: 1, content: "This is a div illustrating a trail animation" },
    { id: 2, content: "This is a div illustrating a trail animation" },
    { id: 4, content: "This is a div illustrating a trail animation" },
    { id: 5, content: "This is a div illustrating a trail animation" },
  ]);
 []);

  const path = useTrail(objects.size, {

    from: { opacity: 1, remodel: "translateY(0px)" },
    to: { opacity: 0, remodel: "translateY(100px)" },
    delay: 400,
    length: 2000,
  });

  return (
    <div className="container">
      {path.map((props, index) => (
        <animated.div key={objects[index].id} fashion={props} className="merchandise">
          {objects[index].content material}
        </animated.div>
      ))}
    </div>
  );
}

export default App;
Within the code snippet above, we create a CardCarousel element that makes use of the useTrail hook to create a path of animations for every card carousel based mostly on the size of the objects within the array.
Observe: to study extra concerning the useEffect hook, try Understanding React useEffect.
const path = useTrail(objects.size, {

  from: { opacity: 1, remodel: "translateY(0px)" },
  to: { opacity: 0, remodel: "translateY(100px)" },
  delay: 400,
  length: 2000,
});
Right here, it defines the preliminary and remaining states of the animation (from and to) in addition to the transition configuration (length and easing) which impacts the best way the animation is proven.
Rendering every card
To render every card, the element returns a <div> with the category card-carousel and maps over the path array to render every animated card. Every card is then wrapped in an animated.div element making use of the animated types (opacity and remodel) outlined within the useTrail hook:
return (
    <div className="container">
      {path.map((props, index) => (
        <animated.div key={objects[index].id} fashion={props} className="merchandise">
          {objects[index].content material}
        </animated.div>
      ))}
    </div>
  );

Mastering Animation Sequences with useChain
Not like standalone animations, useChain is used to hyperlink a number of animations collectively, and units a sequence on how pre-defined animations are carried out. That is significantly helpful when creating dynamic person interfaces the place parts have to animate one after one other.
Let’s have a look at the syntax.
useChain accepts an array of animation refs and an non-compulsory configuration object. Every animation ref represents a separate animation, they usually’re executed within the order they seem within the array. We are able to additionally specify delays for every animation to regulate the timing of the sequence utilizing this syntax:
useChain([ref1, ref2, ref3], { delay: 200 });
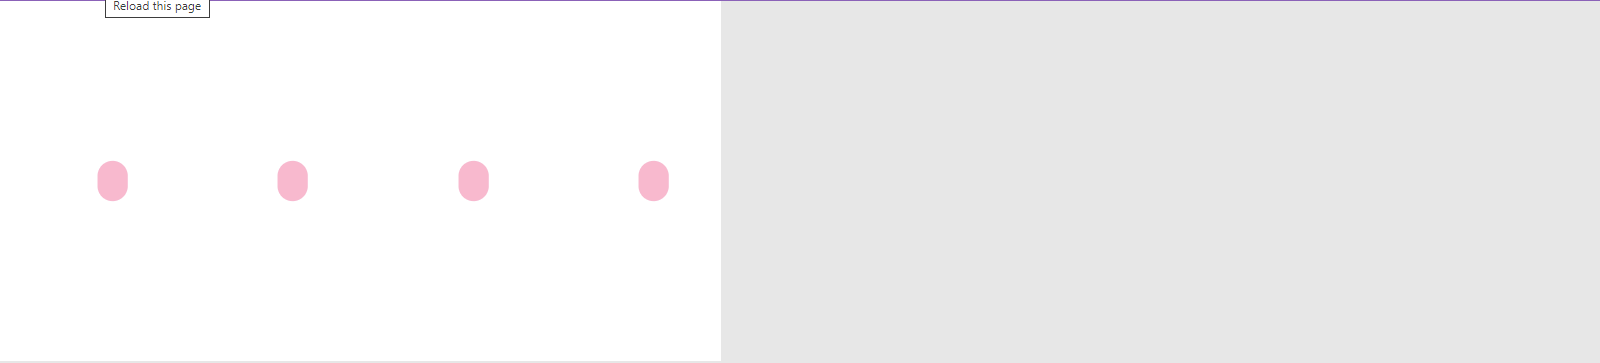
For example how this works, let’s create a element that applies two animations on completely different parts and controls the animations utilizing useChain:
import "./App.css";

import React, { useRef } from "react";
import {
  useTransition,
  useSpring,
  useChain,
  animated,
  useSpringRef,
} from "react-spring";

const information = ["", "", "", ""];

perform App() {
  const springRef = useSpringRef();
  const springs = useSpring({
    ref: springRef,
    from: { dimension: "20%" },
    to: { dimension: "100%" },
    config: { length: 2500 },
  });

  const transRef = useSpringRef();
  const transitions = useTransition(information, {
    ref: transRef,
    from: { scale: 0, backgroundColor: "pink" },
    enter: { scale: 1, backgroundColor: "plum" },
    go away: { scale: 0, colour: "pink" },
    config: { length: 3500 },
  });

  useChain([springRef, transRef]);

  return (
    <animated.div
      fashion={{
        show: "flex",
        alignItems: "heart",
        justifyContent: "heart",
        top: "400px",
        width: springs.dimension,
        background: "white",
      }}
    >
      {transitions((fashion, merchandise) => (
        <animated.div
          fashion={{
            width: "200px",
            top: "200px",
            show: "flex",
            justifyContent: "heart",
            alignItems: "heart",
            textAlign: "heart",
            marginLeft: "50px",
            colour: "white",
            fontSize: "35px",
            borderRadius: "360px",
            ...fashion,
          }}
          className="merchandise"
        >
          {merchandise}
        </animated.div>
      ))}
    </animated.div>
  );
}

export default App;
Within the code above, we’re creating two completely different animations, utilizing useString and useTransition, and utilizing the useChain to handle the completely different animations:
useChain([springRef, transRef]);
Creating A number of Animations Utilizing the useSprings Hook
As we talked about earlier, useSprings is used to create a number of spring animations on the identical time, and every of those animations has its configurations. This enables us to animate a number of parts or properties independently throughout the identical element. For instance:
import { useSprings, animated } from "@react-spring/net";

perform App() {
  const [springs, api] = useSprings(
    3,
    () => ({
      from: { scale: 0, colour: "blue" },
      to: { scale: 1, colour: "crimson" },
      config: { length: 2500 },
    }),
    []
  );

  return (
    <div>
      {springs.map((props) => (
        <animated.div fashion={props} className="springsText">
          _______
        </animated.div>
      ))}
    </div>
  );
}

export default App;
On this instance, useSprings manages an array of spring animations, every representing the animation for one merchandise within the objects array. Every merchandise within the listing is related to a spring configuration that defines the preliminary and goal values for the colour and scale properties. React Spring then animates every merchandise based mostly on its corresponding configuration.

Conclusion
React Spring is a strong animation library that allows us to create gorgeous and interactive animations in our React functions. As we’ve seen, these animations will be utilized on varied parts in our initiatives.
By leveraging the options of React Spring, we will obtain smoother transitions with extra natural-looking results, and larger management over our animations.
