

On this tutorial, we’ll have a look at what static recordsdata are in Django, the advantages of managing them effectively, their function in internet functions, and we’ll arrange a demo challenge for example learn how to handle and serve static recordsdata utilizing completely different strategies and instruments.
Django is a high-level Python internet growth framework that gives internet builders with a robust toolkit to create internet functions rapidly and effectively.
Whereas Django is nice for creating internet functions rapidly and effectively, it’s equally necessary to handle the appear and feel of the net functions you develop. To be able to do this, you’ve discover ways to handle the property that assist and supply the appear and feel of your functions.
Static Recordsdata in Django
In Django, static recordsdata are these recordsdata which might be served on to the consumer with none processing by the server.
These sometimes embody CSS, JavaScript recordsdata, photos, icons, fonts and different property needed for the appear and feel of your internet utility.
Django offers mechanisms to handle and serve these static recordsdata effectively, guaranteeing a clean consumer expertise.
Managing static recordsdata effectively
To make sure that the customers of your internet utility have a superb consumer expertise and the appliance performs as anticipated, you must handle the static recordsdata effectively.
Correctly organizing and caching static recordsdata will guarantee quick web page load instances, and that responsiveness is improved, enhancing total consumer satisfaction.
Django gives numerous instruments and conventions to help within the dealing with of static recordsdata.
The aim of static recordsdata in internet functions
Static recordsdata are crucial, as they set out how an internet utility seems and feels. They outline how parts in an utility are styled, how they behave in response to consumer interactions, and finally what a consumer sees after they go to a specific internet utility.
Once you serve the static recordsdata effectively, you’ll be capable to create a visually interesting and responsive consumer interface, making the appliance extra participating and consumer pleasant.
Setting Up a Demo Challenge
As an example the ideas of static recordsdata administration in Django, we’ll arrange a demo challenge from scratch.
This challenge will embody making a Django challenge, configuring static file settings, and integrating static recordsdata right into a easy internet utility.
By following together with the demo challenge, you’ll achieve hands-on expertise with managing static recordsdata in Django and perceive their significance in internet growth.
For the needs of this tutorial, we are going to create a touchdown web page such that when customers go to the house web page of our challenge, they’ll see a styled heading welcoming them to the location. It’ll additionally show at the moment’s date utilizing JavaScript, and we will even serve a picture to finish the web page.
Making a listing to carry the challenge
Let’s start by making a listing that may maintain the demo challenge utilizing the next command:
mkdir sitepoint_django_static_tut
Making a digital surroundings
It’s advisable that you just create and isolate new initiatives inside digital environments. Which means that every challenge may have its personal dependencies with out affecting the worldwide Python set up.
We’ll use the virtualenv package deal to create it. If it isn’t put in in your growth surroundings, set up it utilizing pip set up virtualenv, and create a digital surroundings utilizing the next command:
virtualenv myenv
The above command creates a digital surroundings named myenv. To make use of the digital surroundings, you must activate it:
Linux/macOS:
. myenv/bin/activate
Home windows:
. myenvScriptsactivate
Putting in dependencies
As soon as the digital surroundings is lively, now you can go forward and set up the dependencies of your challenge. For a begin, we’ll set up Django. We’ll set up different dependencies as we get to the sections that exhibit their utilization:
pip set up Django
This can set up the newest steady model of Django, which on the time of writing is model 5.0.
Making a Django challenge
Upon profitable set up of Django, you now have entry to Django administration instructions. Let’s use them to create a Django challenge within the digital surroundings:
django-admin startproject sitepoint_django .
The command above will create Django challenge named sitepoint_django and the dot on the finish signifies that we intend to create the challenge within the present listing.
Making a demo app
As an example the varied ideas of the static file administration, we have to create at the very least one Django app in our challenge:
python handle.py startapp static_demo
This can create a brand new app in our challenge named static_demo. For it to be acknowledged by our challenge, we’ve so as to add it to the put in apps setting within the settings.py file of our challenge. Open up sitepoint_django/settings.py, go to the INSTALLED_APPS setting and add static_demo.apps.StaticDemoConfig to the underside of the listing, as proven beneath:
INSTALLED_APPS = [

    'static_demo.apps.StaticDemoConfig',
]
Creating the house web page template
We’ll render some HTML when the consumer visits the house web page of our web site. Within the static_demo app, create a templates listing, and in it create one other listing and title it static_demo. On this listing, create a template and title it index.html so the trail will likely be static_demo/templates/static_demo/index.html.
Place the next code into index.html:
<!DOCTYPE html>
<html lang="en">
<head>
    <meta charset="UTF-8">
    <meta title="viewport" content material="width=device-width, initial-scale=1.0">
    <title>Sitepoint Django Tutorial</title>
</head>
<physique>
    <h2>Whats up there, welcome to our nice web site!</h2>
</physique>
</html>
Creating the index view
For the template to be proven to customers at any time when they go to the house web page of our app, we have to create a view operate that will likely be triggered to render the house.html template. Open the static_demo/views.py file and put within the following code:
from django.shortcuts import render

def index(request):
    return render(request, "static_demo/house.html")
Creating the static_demo URL file
We wish the index view within the static_demo app to render the house web page at any time when a consumer visits our web site. So we’ll create a URL scheme for the view operate that may render the house web page. For that, we have to create a urls.py file for the static_demo app, then join the static_demo URL file to initiatives URL file.
Subsequently, within the static_demo app, create a file and title it urls.py and add the next code into it:
from django.urls import path
from .import views

app_name = 'static_demo'

urlpatterns = [
    path('', views.index, name="index"),
]
The code above creates a URL for the index view of our challenge, so if a consumer visits one thing like http://oursite.com/, or in case you go to http://127.0.0.1:8000 in growth, the index view will likely be known as to answer that.
Let’s add it to the challenge URL file. Open up the sitepoint_django/urls.py file and add within the following code:
from django.contrib import admin
from django.urls import path, embody

urlpatterns = [
    path('admin/', admin.site.urls),
    path('', include('static_demo.urls')),
]
The code above makes some modifications to the default urls.py file. We’ve added an import for embody operate, which tells Django that we’re together with the static_demo.urls.
Testing the challenge
The preliminary configuration of the challenge is completed at this level. Let’s run the event server to see if the whole lot is tied up effectively.
Run the challenge with the next command:
python handle.py runserver
If the whole lot is setup appropriately, you need to be capable to go to http://127.0.0.1:8000. You’ll see some unstyled textual content welcoming you to the location.
Serving Static Recordsdata in Growth
To be able to add styling to the web page, JavaScript for the date, and the picture, we’ve to make modifications to the challenge. Let’s accomplish that incrementally and see how we are able to serve the completely different static recordsdata in numerous methods, beginning with the event surroundings.
Organising a static recordsdata listing
Django recommends that each one static property be managed appwise: that’s, all CSS, JS and pictures {that a} specific app wants needs to be resident within the confines of that app. So let’s replace the static_demo app and create a listing named static, and inside it create one other listing named static_demo. Then within the static_demo listing create three extra directories: css, js, and photos. Ultimately, we’ll have a construction just like the one beneath:
static_demo/
    └── static/
        └── static_demo/
            ├── css/
            ├── js/
            └── photos/
The rationale why you’ll wish to create a static_demo listing within the static listing is that will help you namespace your static property. When you have a couple of app, and you’ve got the CSS in each apps named as kinds.css, Django would solely work with the primary stylesheet it finds, because it wouldn’t be capable to distinguish between the others. Subsequently, we namespace them in order that Django will be capable to know which asset file we’re referring to in our templates.
Creating the static recordsdata
On this step, let’s simply arrange minimal static property that may exhibit how one can serve the recordsdata in growth.
Within the js listing, create a file and title it todays_date.js, and add the next code:
let formattedDate = new Date().toLocaleDateString();

doc.getElementById('todaysDate').innerText = `The date at the moment is ${formattedDate}`;
The code above will get at the moment’s date from JavaScript, codecs it right into a string, after which shows it in a div with an ID of todaysDate.
Within the css listing, create a file, title it kinds.css, and add the next code:
physique {
    show: flex;
    flex-direction: column;
    justify-content: heart;
    align-items: heart;
    margin: 0;
}

h2 {
    font-size: 24px;
    coloration: inexperienced;
}
The code above makes use of the Flexbox format to heart all of the gadgets on the web page each horizontally and vertically. It additionally units the H2 component’s font measurement to 24px and its coloration to inexperienced.
For the picture, you should use any picture of your liking. Simply copy some picture into the photos listing and pay attention to the title.
Configuring static file settings
To serve static recordsdata in growth, various issues have to be set within the Django settings.py file. Open the sitepoint_django/settings.py file and examine to see it you’ve the next settings:
DEBUG=True
In growth, it’s usually advisable to set DEBUG to True in your Django challenge settings. This setting permits numerous debugging options, together with detailed error messages and stack traces, that are invaluable for diagnosing and fixing points throughout growth.
Moreover, when DEBUG is about to True, the django.contrib.staticfiles app robotically serves static recordsdata from every app’s static listing. This conduct simplifies the event course of by eliminating the necessity for handbook configuration to serve static recordsdata.
Within the INSTALLED_APPS setting, examine to see when you have the django.contrib.staticfiles added. If not, add it above the apps you’ve within the challenge. For instance, on this challenge add it above the static_demo app string, as proven beneath:
INSTALLED_APPS = [

    'django.contrib.staticfiles',
    'static_demo.apps.StaticDemoConfig',
]
The django.contrib.staticfiles app supplied by Django is crucial for serving static recordsdata throughout growth. By default, it traverses your challenge’s apps to find static file directories inside every app. Nevertheless, when you have extra static property that aren’t related to any specific app, you may nonetheless make them accessible to django.contrib.staticfiles by setting the STATICFILES_DIRS setting in your challenge’s settings.py file. This setting lets you specify extra directories the place static recordsdata are situated. For instance:
STATICFILES_DIRS = [
    "/dir/with/staticfiles/static",
    "/someother/dir/static",
    "/home/example.com/static",
]
Along with DEBUG and STATICFILES_DIRS, one other necessary setting to incorporate in your Django challenge settings file is STATIC_URL. Whereas Django offers a default worth for STATIC_URL, you may explicitly outline it in your settings.py file if it’s not already current.
The STATIC_URL setting specifies the bottom URL from which static property will likely be served. For instance, setting STATIC_URL = "static/" instructs Django to serve static property from the /static/ URL path. Which means that, as an example, the kinds file situated within the static_demo app will likely be accessible at a URL like http://127.0.0.1:8000/static/static_demo/css/kinds.css.
Updating the template
With the settings out of the best way, to make use of the static recordsdata within the template, we’ve to replace it with the next HTML:
{% load static %}

<!DOCTYPE html>
<html lang="en">
<head>
    <meta charset="UTF-8">
    <meta title="viewport" content material="width=device-width, initial-scale=1.0">
    <title>Sitepoint Django Tutorial</title>


    <hyperlink rel="stylesheet" href="{% static 'static_demo/css/kinds.css'%}">
</head>
<physique>
    <h2>Whats up there, welcome to our nice web site</h2>
    <p id="todaysDate"></p>

    <img src="{% static 'static_demo/photos/flowerImage.png' %}" alt="Flower Picture">


    <script src="{% static 'static_demo/js/todays_date.js' %}"></script>
</physique>
</html>
That template replace introduces us to a brand new tag: {% load static %}. This tag hundreds the static file dealing with performance supplied by the Django templating engine. Together with this tag in a Django template file permits us to make use of template tags and filters associated to static recordsdata.
For instance, utilizing it in our template permits us to reference static recordsdata like photos, CSS and JS in HTML parts. Utilizing it additionally permits Django to generate URLs for the references static property:
<hyperlink rel="stylesheet" href="{% static 'static_demo/css/kinds.css'%}">

<img src="{% static 'static_demo/photos/flowerImage.png' %}" alt="Flower Picture">

<script src="{% static 'static_demo/js/todays_date.js' %}"></script>
With these settings and the template replace in place, we should always run the challenge and see if the recordsdata are being served in growth. Run the challenge utilizing the next command:
python handle.py runserver
If the whole lot is about up appropriately, we should always have the event server working on http://127.0.0.1:8000. If we go to that hyperlink, we should always have web page just like the one beneath.
Having an analogous picture exhibits that the static recordsdata have been utilized appropriately.
You must be aware that in Django growth, when DEBUG=True in your challenge’s settings, and django.contrib.staticfiles is enabled, this permits Django’s growth server (runserver) to serve static recordsdata. On this situation, any modifications made to static recordsdata, similar to CSS, JavaScript, or photos, are robotically detected and utilized by Django. This seamless course of vastly simplifies growth, as you’ll immediately see the results of your modifications with no need to manually refresh or restart the server.
Nevertheless, in manufacturing environments, serving static recordsdata sometimes entails utilizing a separate internet server or CDN. On this case, modifications to static recordsdata might not be robotically detected and utilized by Django, necessitating handbook intervention to make sure that the up to date recordsdata are served to customers. Moreover, in case you choose to manually serve static recordsdata utilizing a distinct methodology, such because the django.views.static.serve() view, computerized detection and utility of modifications might not happen, and you could have to implement your individual mechanisms for dealing with static file updates.
Serving Static Recordsdata Utilizing WhiteNoise
In growth, whereas django.contrib.staticfiles simplifies the method of serving static property, guaranteeing seamless updates as you make modifications.
Nevertheless, when transitioning to manufacturing, settings like DEBUG=True have to be disabled, and static recordsdata may be served from a CDN or one other server. This necessitates an answer that bridges each environments — enabling clean serving of recordsdata throughout growth whereas precisely reflecting the manufacturing surroundings.
Enter the WhiteNoise package deal. Designed to seamlessly combine with Django, WhiteNoise gives a sturdy resolution for serving static recordsdata in each growth and manufacturing environments, offering a unified method that ensures consistency and reliability throughout deployment phases. Let’s discover WhiteNoise.
Putting in and configuring WhiteNoise in Django
Getting began with WhiteNoise is easy .On this part, we’ll stroll by means of the set up course of and information you on learn how to configure WhiteNoise inside your Django challenge.
We set up WhiteNoise like so:
pip set up whitenoise
After profitable set up, head over to sitepoint_django/settings.py, scroll right down to the underside, and discover the STATIC_URL setting. Under it, add the STATIC_ROOT setting:
STATIC_ROOT = BASEDIR / "staticfiles"
The setting above tells Django that when the collectstatic is run all static property in all apps in your challenge will likely be collected and saved into this listing named staticfiles.
The subsequent factor to do is to run the collectstatic administration command:
python handle.py collectstatic
To allow WhiteNoise, you must add it to the MIDDLEWARE settings listing, edit the settings.py file, and add the WhiteNoise middleware after the Django SecurityMiddleware and earlier than all different middleware:
MIDDLEWARE = [

    "django.middleware.security.SecurityMiddleware",
    "whitenoise.middleware.WhiteNoiseMiddleware",

]
Utilizing WhiteNoise in growth
With simply the steps above, WhiteNoise can serve you static recordsdata in manufacturing. However in case you run the challenge at this level, the Django growth server will robotically take over static file dealing with. However to profit from related conduct in growth and in manufacturing, it’s a good suggestion to make use of it serve recordsdata in growth as effectively.
To do this, we’ll disable Django’s static file dealing with and permit WhiteNoise to take over by merely modifying the settings file and including the WhiteNoise to INSTALLED_APPS listing setting above the django.contrib.staticfiles:
INSTALLED_APPS = [

    "whitenoise.runserver_nostatic",
    "django.contrib.staticfiles",

]
You additionally have to disable DEBUG by setting it to False:
DEBUG=False
With these steps, you may seamlessly serve your static property utilizing the WhiteNoise package deal.
To confirm that WhiteNoise is certainly serving your recordsdata, you may take away or remark out the django.contrib.staticfiles possibility from the INSTALLED_APPS setting listing. Nevertheless, it’s necessary to notice that eradicating django.contrib.staticfiles will render a couple of static file administration instructions unavailable, such because the collectstatic command. This command is crucial for accumulating and consolidating static recordsdata out of your apps right into a single listing for environment friendly serving in manufacturing environments.
Superior WhiteNoise configuration choices
Whereas the steps above are enough for many instances, WhiteNoise offers a couple of extra choices for configuration. For instance, you may add compression and caching assist to your challenge. To allow it, open the sitepoint_django/settings.py file and add the next settings:
STORAGES = {

    "staticfiles": {
        "BACKEND": "whitenoise.storage.CompressedManifestStaticFilesStorage",
    },
}
The setting above will be certain that WhiteNoise compresses and hashes the static recordsdata to distinctive title, so they are going to be safely cached.
Utilizing WhiteNoise in shared internet hosting environments
Shared internet hosting is a sort of hosting service the place a number of web sites are hosted on a single bodily server. On this setup, assets similar to disk house, bandwidth, and processing energy are shared amongst a number of customers, making it a cheap possibility for internet hosting small to medium-sized web sites.
Shared internet hosting environments are sometimes managed by internet hosting suppliers, who deal with server upkeep, safety, and technical assist, permitting web site house owners to deal with constructing and managing their web sites with no need to fret about server administration duties.
Challenges of managing static recordsdata in shared internet hosting
Whereas shared internet hosting gives an inexpensive and handy internet hosting resolution for a lot of web sites, it additionally has limitations in comparison with different kinds of internet hosting, similar to digital personal servers (VPS) or devoted servers. These limitations embody the next:
-
Restrictions to server configurations and settings, limiting the flexibility to customise server software program or set up extra instruments.
-
Useful resource constraints similar to disk house additionally play a job, as there may be limitations on the quantity of bandwidth that can be utilized to serve these recordsdata to guests.
-
Efficiency may be one other problem in shared internet hosting, as a result of sharing assets with different customers can lead to slower load instances for static recordsdata, particularly in periods of excessive site visitors or useful resource utilization.
Configuring to make use of WhiteNoise
WhiteNoise is a Python package deal that seamlessly integrates with Django, making it a perfect selection for serving static recordsdata in shared internet hosting environments. Not like different software program installations similar to Apache and Nginx, which might not be permissible in sure internet hosting environments, WhiteNoise could be simply put in alongside your different challenge packages.
By configuring Django to make use of WhiteNoise, you may effectively serve static recordsdata immediately out of your Django utility with out the necessity for extra server software program. This simplifies the setup course of and ensures compatibility with a variety of internet hosting suppliers.
Most shared internet hosting suppliers present a cPanel that lets you do server configurations and file uploads. So when you’ve uploaded your recordsdata, you can also make the next modifications to the challenge settings.py file:
STATIC_URL='static/'


STATIC_ROOT='/house/username/public_html/static'


STATIC_ROOT='/house/username/subdomain.mydomain.com/static'
With these settings in place, all you have to do is run the collectstatic command in order that your static recordsdata will likely be collected into any of the above STATIC_ROOT directories, relying on the area.
Serving Static Recordsdata From AWS S3
Amazon Easy Storage Service (S3) is a scalable object storage service supplied by Amazon Net Providers (AWS). It permits customers to create storage areas generally known as buckets the place you may retailer your numerous varieties of information like paperwork, photos, movies and notable for our tutorial static recordsdata.
AWS gives a free tier for a number of of its providers, together with Amazon S3. The free tier permits customers to get began with AWS providers without charge for a sure interval or as much as particular utilization limits. To get began, you may signup for the S3 free tier. Nevertheless, to finish the signup course of you’ll want to offer cost info.
Creating an S3 Bucket
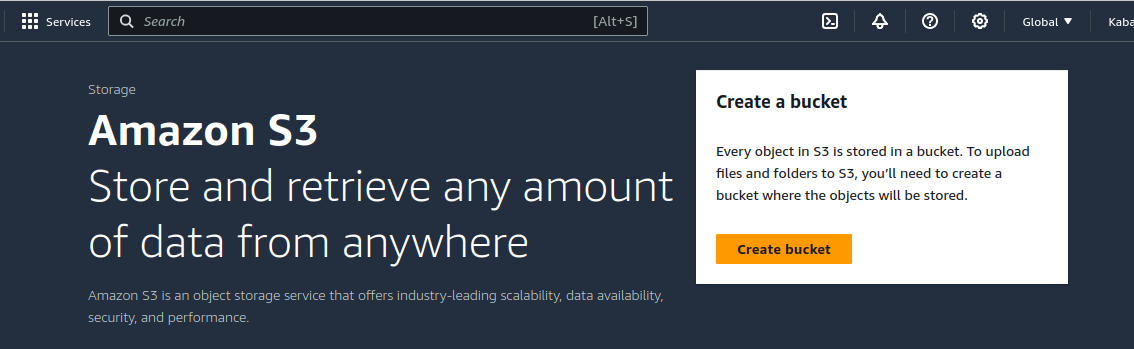
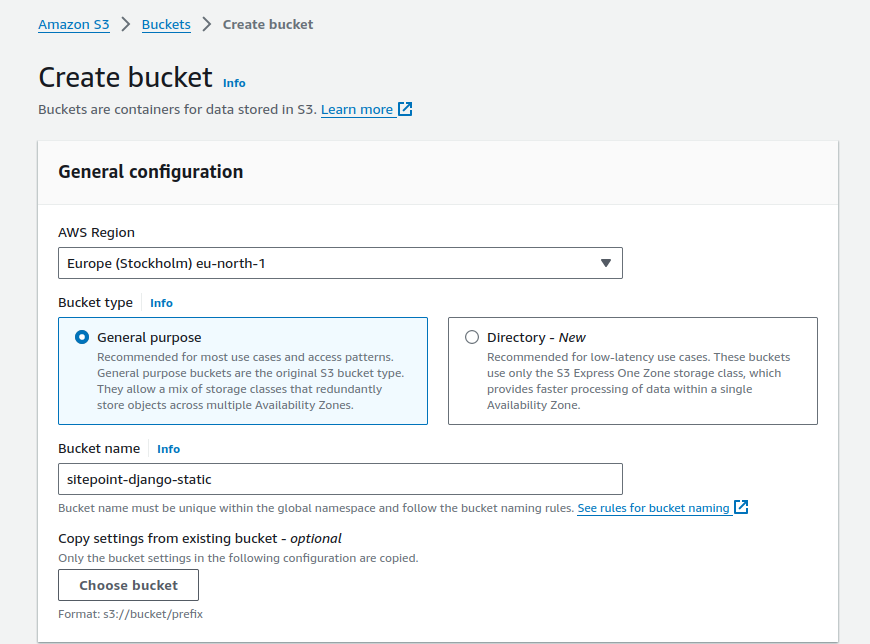
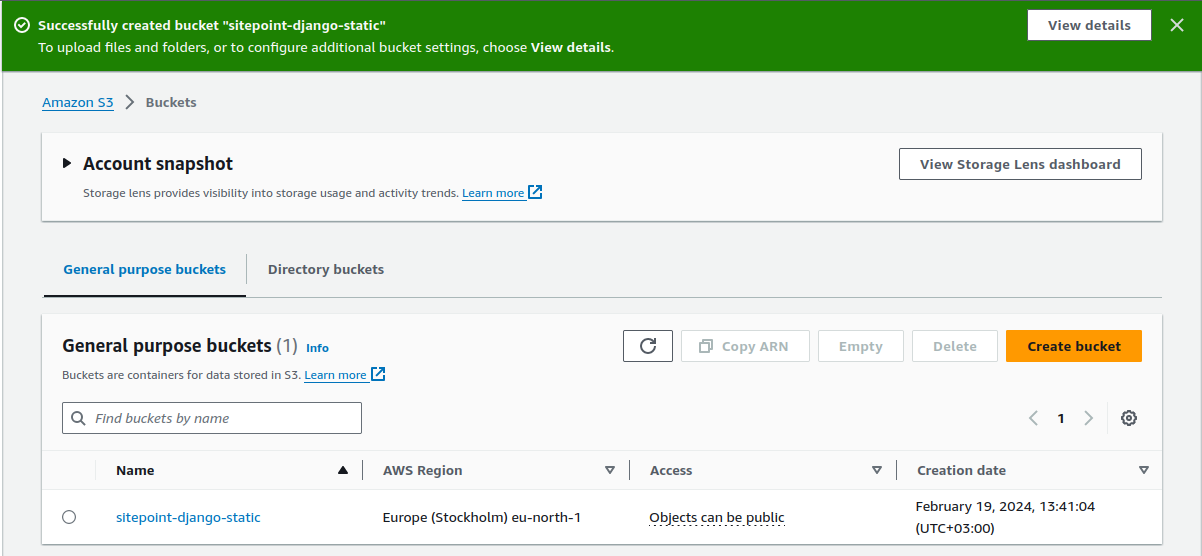
To create a bucket, go to the S3 dashboard and click on on the Create bucket button.
Give the bucket a singular dns-compliant title. You’ll be able to optionally choose a area nearer to you or your customers.
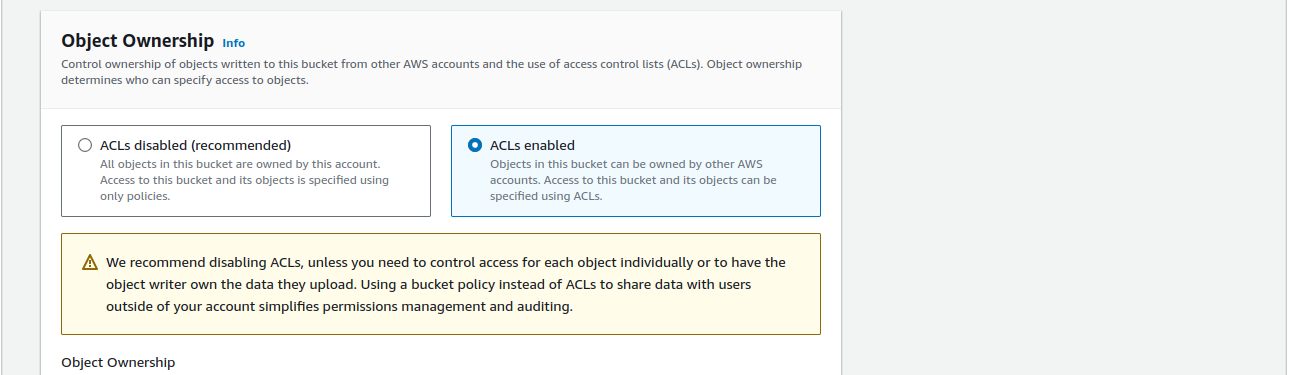
Allow ACL for the bucket.
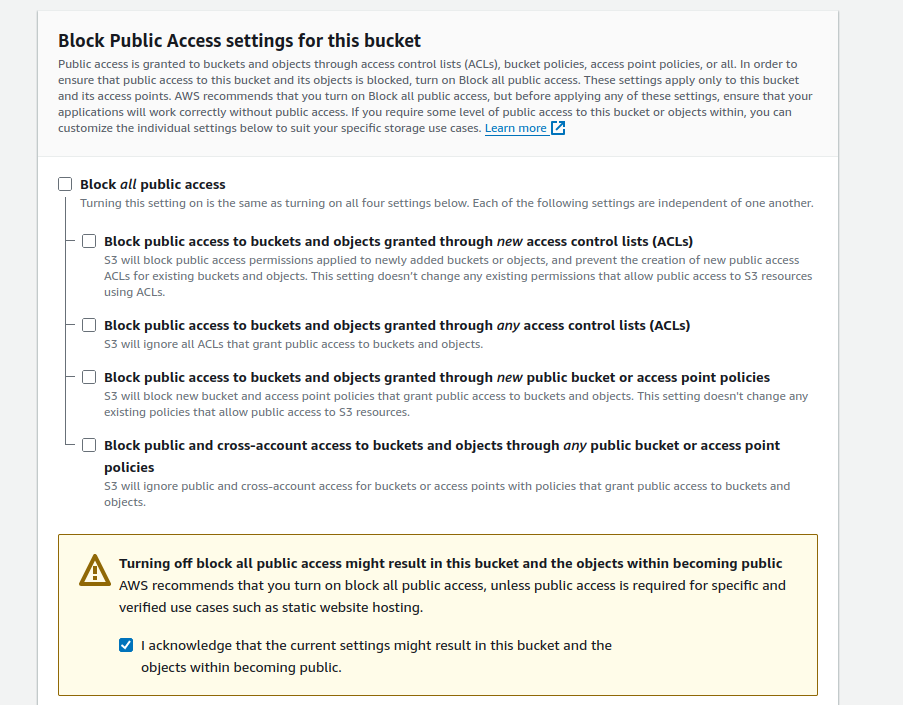
Allow public entry for the bucket, by turning off Block all public entry.
Upon profitable creation, you need to see your bucket on the primary S3 web page.
Enabling IAM entry
After creation of a bucket, you should use the bucket as a root consumer, however AWS recommends you create an IAM (Id Entry Administration) consumer group and assign them entry to solely a specific bucket.
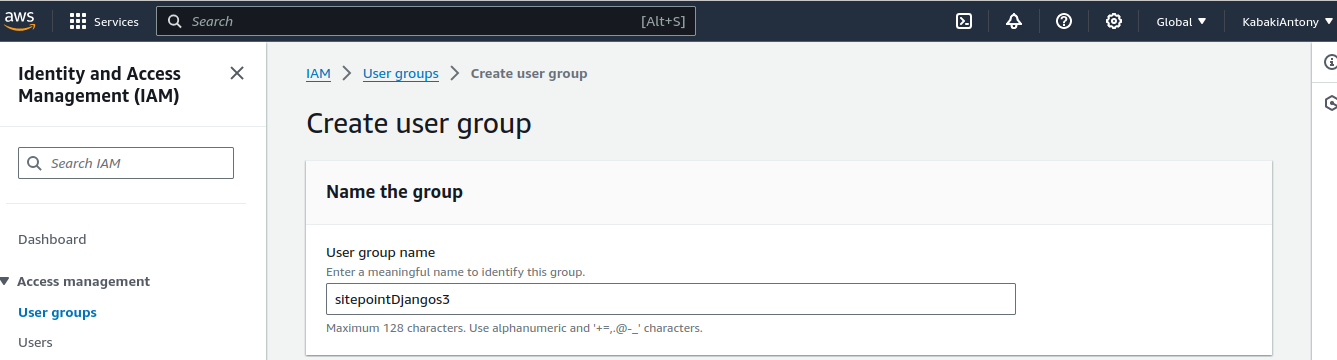
Creating IAM group
Go to the primary IAM web page and choose Person teams on the sidebar. Then click on the Create group button. Assign the group a reputation.
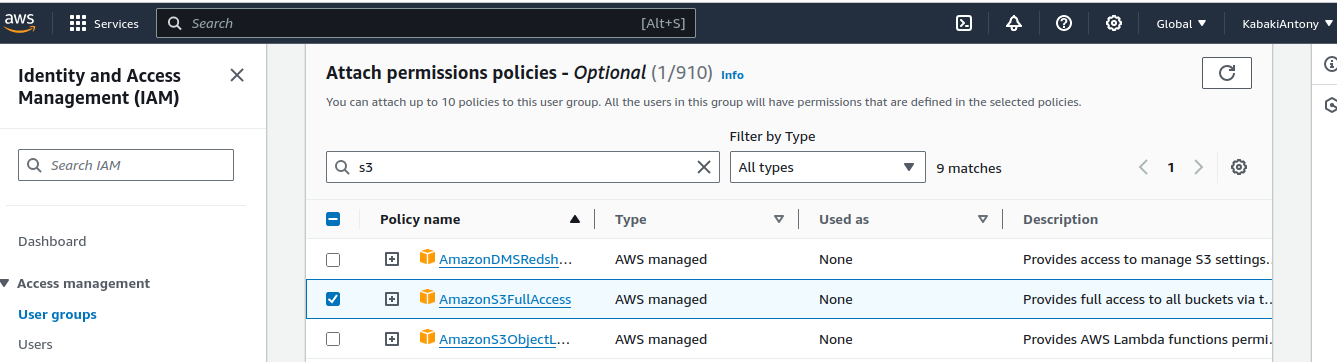
Then below Connect permisions polices, seek for S3 and assign AmazonS3FullAccess the clicking Create group button.
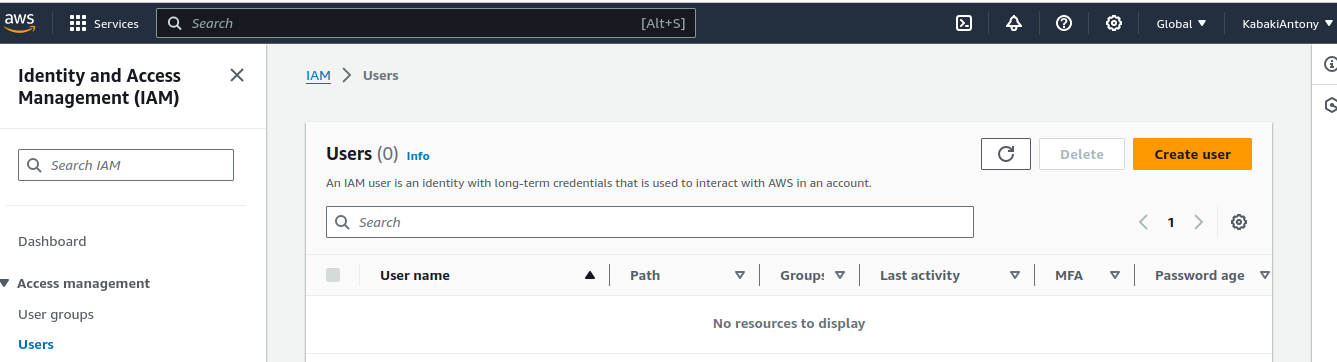
Creating IAM consumer
Whereas nonetheless on the IAM web page, choose Customers on the panel on the left and the clicking the Create consumer button.
Give the IAM consumer a reputation and click on the Subsequent button.
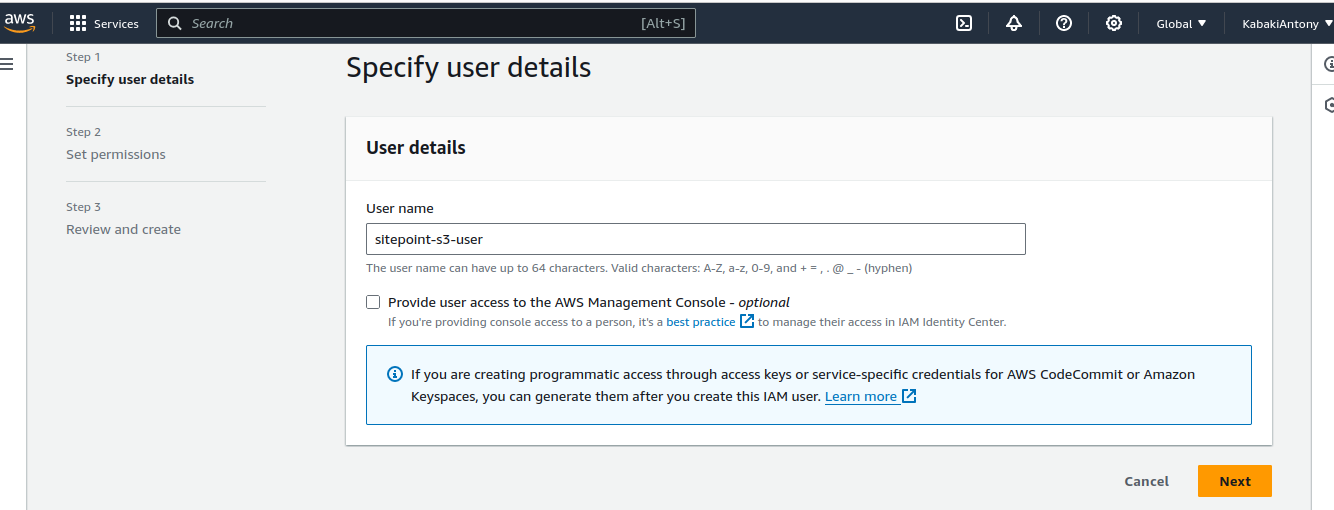
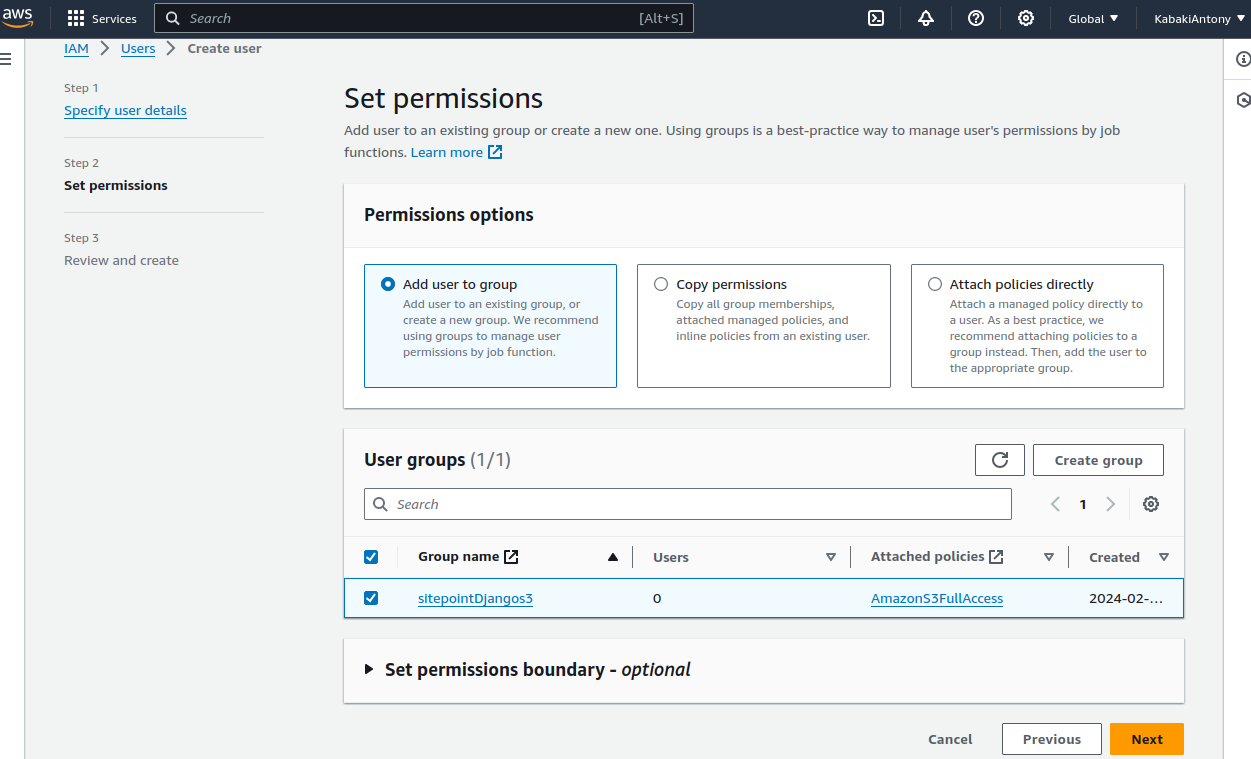
Underneath the Set permissions possibility, go away the Add consumer to group as the chosen possibility, then go to Person teams and choose the consumer group you created above after which click on the Subsequent button.
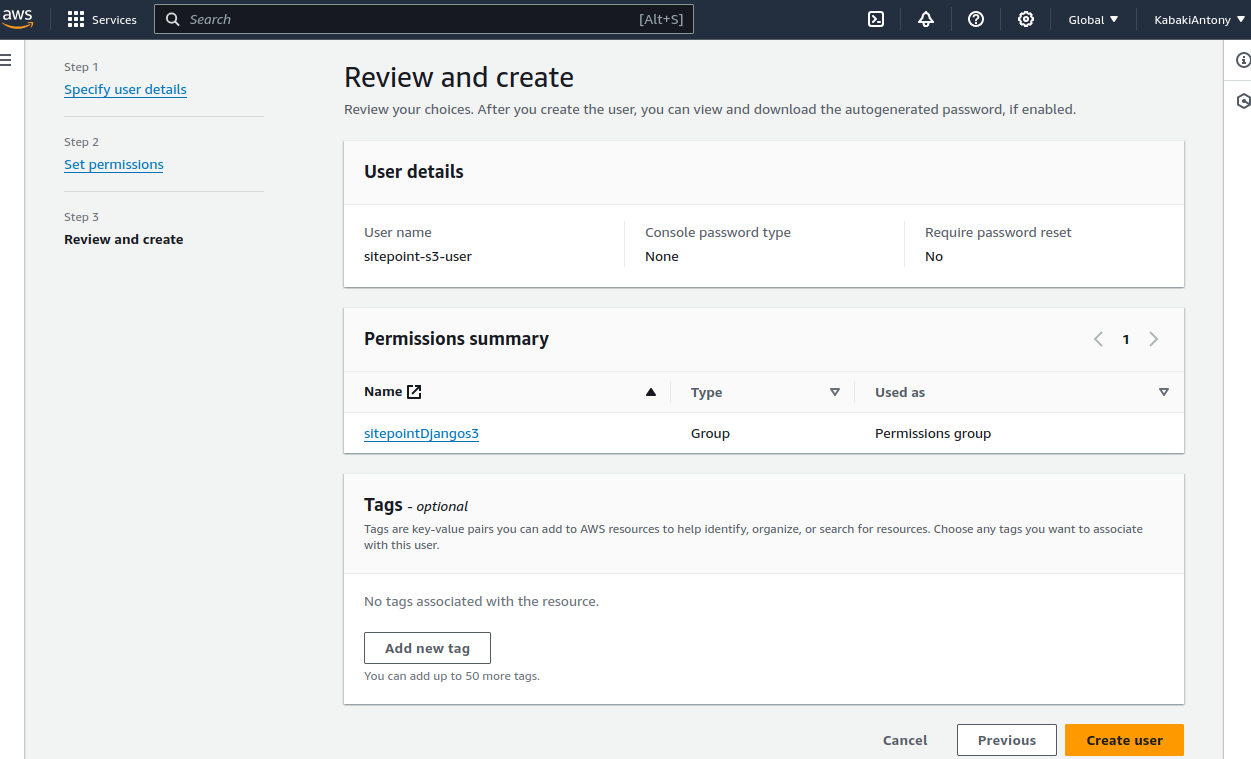
Evaluation and click on Create consumer.
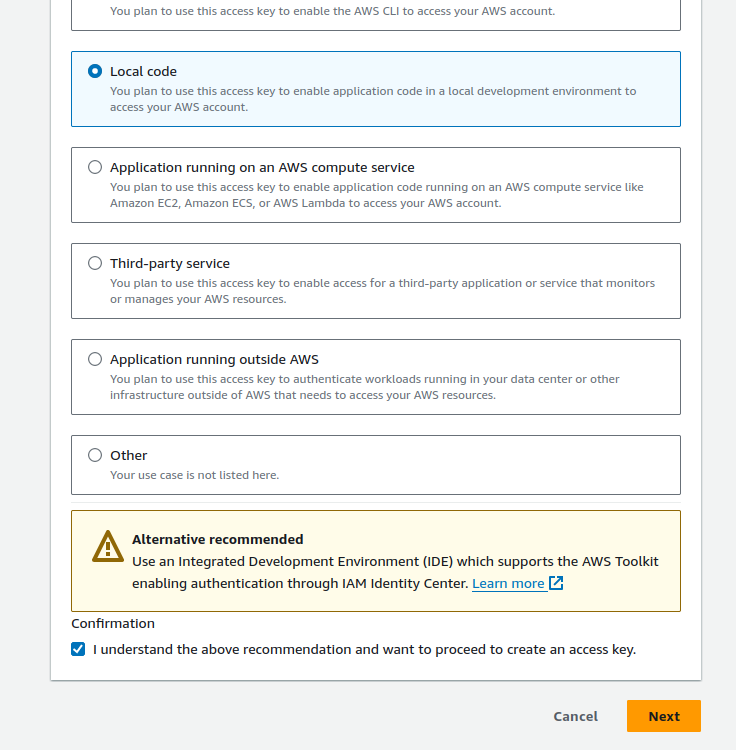
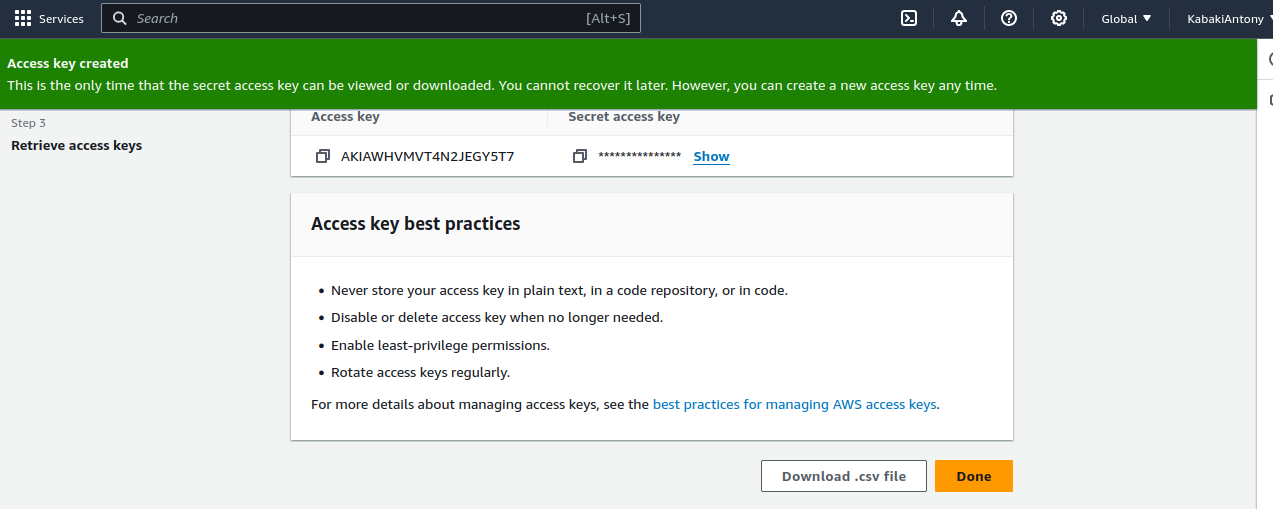
Now click on on the consumer title to view the consumer particulars. Click on on the Safety credentials tab after which click on Create entry key. Select Native code and click on the Subsequent button.
After that, click on the Create entry key button. You’ll be able to copy the keys to your .env file when you have one, or obtain the CSV file for later utilization.
Configuring Django to make use of AWS S3 for static recordsdata
After creating the S3 bucket, we have to configure the challenge to serve recordsdata from S3. Within the earlier part, we configured WhiteNoise to serve our static property. We have to disable WhiteNoise in order that we are able to serve the property from S3. To do this, go to the sitepoint_django/settings.py file and the remark out the related traces of code:
INSTALLED_APPS = [


]

MIDDLEWARE = [


]
The code above feedback out all of the settings we had put in place for WhiteNoise.
Putting in packages
For the challenge to have the ability to work with S3, we have to set up two packages: boto3 and django-storages. boto3 offers the low-level Python API for interacting with AWS providers, whereas django-storages extends Django’s file storage capabilities to combine with cloud storage suppliers like Amazon S3, permitting you to seamlessly handle and serve static and media recordsdata in your Django utility:
pip set up boto3 django-storages
Configuring settings
For our challenge to have the ability to serve recordsdata from S3, we have to make a couple of modifications to the settings.py file and replace it with the next code:
import os


STORAGES = {
    'staticfiles': {
        'BACKEND': 'storages.backends.s3boto3.S3Boto3Storage',
        'OPTIONS': {
            'bucket_name': os.getenv('AWS_STORAGE_BUCKET_NAME'),
            'location': 'static',
            'querystring_auth': False,
        },
    }
}
The settings above create a STORAGES dictionary that serves as a centralized configuration container for outlining numerous storage backends used inside the challenge.
It’s necessary to notice this setting is simply accessible for variations of Django from 4.2 and above. For earlier variations, go to the documentation.
Within the code above, we’ve a setting for staticfiles which identifies the storage configuration for managing static recordsdata.
After the STORAGES settings we have to add some AWS-specific settings in our settings file, so scroll to the portion the place you’ll discover the STATIC_URL setting and the make the next modifications:
USE_S3 = os.getenv('USE_S3')

if USE_S3:
    AWS_ACCESS_KEY_ID = os.getenv('AWS_ACCESS_KEY_ID')
    AWS_SECRET_ACCESS_KEY = os.getenv('AWS_SECRET_ACCESS_KEY')
    AWS_S3_OBJECT_PARAMETERS = {
        "CacheControl": "max-age=2592000",
    }

else:
    STATIC_URL = 'static/'
    STATIC_ROOT = BASE_DIR / 'staticfiles'
Importing static recordsdata to S3
As soon as the settings are in place, the subsequent activity is to add your static recordsdata to the S3 bucket. You do this by working collectstatic:
python handle.py collectstatic --no-input
This can accumulate all static recordsdata in our challenge’s apps, transfer them into the S3 bucket, and put them right into a static folder as outlined within the STORAGES dictionary. The no --no-input flag instructs Django to run in non-interactive mode, bypassing any prompts for consumer enter.
When used, Django will robotically proceed with that static recordsdata collections course of with out requiring any handbook intervention from the consumer.
Operating the challenge
As soon as all of the settings are in place, you may run the challenge. Let’s run the challenge in growth and serve the recordsdata from the S3 bucket:
python handle.py runserver
To confirm that you’re certainly serving recordsdata from S3, you may view the supply code of the house web page:
<hyperlink rel="stylesheet" href="https://sitepoint-django-static.s3.amazonaws.com/static/static_demo/css/kinds.css">

<img src="https://sitepoint-django-static.s3.amazonaws.com/static/static_demo/photos/flowerImage.png" alt="Flower Picture">

<script src="https://sitepoint-django-static.s3.amazonaws.com/static/static_demo/js/todays_date.js"></script>
Trying on the HTML parts reveals that certainly the URLs level to the S3 bucket.
Conclusion
In abstract, managing static recordsdata in Django entails assessing challenge necessities, scalability wants, and internet hosting surroundings constraints to decide on essentially the most appropriate methodology.
For instance, WhiteNoise middleware offers an environment friendly resolution for serving static recordsdata in shared internet hosting environments, the place useful resource constraints and restricted server entry might pose challenges.
By configuring Django settings appropriately and leveraging instruments like WhiteNoise, builders can guarantee dependable and optimized static file serving, whatever the internet hosting surroundings. Every methodology gives its personal benefits and concerns, requiring cautious analysis to satisfy the precise wants of the challenge and ship a seamless consumer expertise.
We’ve coated a number of key factors:
Strategies for managing static recordsdata. We’ve mentioned numerous approaches, together with serving static recordsdata regionally, utilizing Django’s built-in growth server, leveraging third-party storage options like Amazon S3, and serving recordsdata utilizing packages like WhiteNoise. Every methodology has its personal benefits and concerns, relying on elements similar to scalability, efficiency, and ease of deployment.
Widespread settings and instructions:
STATIC_ROOT: specifies the listing the place collected static recordsdata will likely be saved.STATIC_URL: defines the bottom URL for accessing static recordsdata by way of the net server.STATICFILES_DIRS: specifies extra directories containing static property.STATICFILES_STORAGE: configures the storage backend for dealing with static recordsdata.collectstatic: collects all static property from all app directories to theSTATIC_ROOT.
Additional studying:
